
Google gave my grad students some free credits to use Google Compute Engine. Here is how we set up a Play app with autoscaling and https support.
When teaching a class with a project that requires a server component, or when experimenting with software for teaching computer science concepts, I used to set up a server with Linux and GlassFish. Nowadays, our servers are ancient and the tech staff is decimated by budget cuts. Fortunately, the cloud has sprung up just at the right time, and initially Amazon gave out generous AWS credits. So I learned how to use AWS instead. And I've moved to Play, mostly because students no longer waste days trying to decipher stack traces from hell.
Laurie White from Google recently sent out an announcement that Google is also giving out credits to academic institutions, which is a good thing since Amazon's generosity has its limits. So I had to give that a try. The beauty of AWS is that, no matter how confused you are, there is someone on stackoverflow who is even more confused, and friendly folks who help out. With Google Compute Engine (GCE), there is far less information out there. I am writing up what I found out, in the hope that someone will find it helpful. (NB. GCE is just like EC2 in AWS. There is also something called Google App Engine, and it's entirely different.)
It's easy enough to set up a single VM with GCE, but I wanted autoscaling, and the service that my students are implementing is called from a learning management system which insists on https.
How hard can this be? A load balancer and some VMs, right? A man, a plan, a canal—Panama!
But both with AWS and GCE, you have to learn a whole bunch of strange vocabulary. It's more like “A man, a plan, a canoe, pasta, heros, rajahs, a coloratura, maps, snipe, percale, macaroni, a gag, a banana bag, a tan, a tag, a banana bag again (or a camel), a crepe, pins, Spam, a rut, a Rolo, cash, a jar, sore hats, a peon, a canal-—Panama!”
Except in my case it's a template, a pool, an instance group, a health check, a backend service, an url map, two proxies, two forwarding rules, and two firewall rules. Not a palindrome, sorry.
So, here goes.
gcloud command-line tool, gcloud auth loginAt https://console.cloud.google.com/apis/library, activate the Google Compute Engine API and the Google Compute Engine Instance Group Manager API.
export REGION=us-central1
export ZONE=us-central1-a
export SERVICE=myservice
export CHECK=basic-check
export TEMPLATE=$SERVICE-template
export GROUP=$SERVICE-group
export CERT=$SERVICE-cert
gcloud compute instance-templates create $TEMPLATE \
  --image-family ubuntu-1604-lts \
  --image-project ubuntu-os-cloud \
  --metadata-from-file startup-script=path/to/install.sh \
  --tags play
In fact, I make
install.sh download the main script that does all the work from a web site. The only thing I put into install.sh are keys and passwords that I wouldn't want to put on a public web site. If there is interest in that process, I can blog about it elsewhere. 
gcloud compute instance-groups managed create $GROUP \
  --base-instance-name instance \
  --size 2 \
  --template $TEMPLATE \
  --zone $ZONE

gcloud compute instance-groups managed set-autoscaling $GROUP \
  --max-num-replicas 6 \
  --target-cpu-utilization 0.8 \
  --zone $ZONE
/. Note that the Play server serves to the default port 9000:
gcloud compute http-health-checks create $CHECK --port 9000

gcloud compute backend-services create $SERVICE \
  --http-health-checks $CHECK

ggcloud compute backend-services update $SERVICE \
  --session-affinity client_ip

cloud compute backend-services add-backend $SERVICE \
  --instance-group $GROUP \
  --instance-group-zone $ZONE
gcloud compute instance-groups managed set-named-ports $GROUP --named-ports http:9000 --zone $ZONEThen make a default URL map. (One can map different URLs to different destinations, so that, for example, static pages are served up by Apache. But I don't need that.)
gcloud compute url-maps create $SERVICE-map \
  --default-service $SERVICE
Now you wire up two proxies, one for http and one for https. The latter needs a certificate; more about that later.
gcloud compute target-http-proxies create $SERVICE-http-proxy \
  --url-map $SERVICE-map

gcloud compute target-https-proxies create $SERVICE-https-proxy \
  --url-map $SERVICE-map \
  --ssl-certificate $CERT
Now you need to wire both of these to a static IP address that you can put in your DNS settings. Or, if you don't care about a nice name, just give the users the static IP. Request it as:
gcloud compute addresses create $SERVICE-address --globalThen forward incoming requests to the proxies:
export ADDRESS=whatever address you got
gcloud compute forwarding-rules create $SERVICE-http-rule \
  --global \
  --address $ADDRESS \
  --target-http-proxy $SERVICE-http-proxy \
  --ports 80

gcloud compute forwarding-rules create $SERVICE-https-rule \
  --global \
  --address $ADDRESS \
  --target-https-proxy $SERVICE-https-proxy \
  --ports 443
(Weirdly enough, you can't reference the address by its symbolic name.)
gcloud compute firewall-rules create play-allow-http-9000 \
  --allow tcp:9000 \
  --source-ranges 0.0.0.0/0 \
  --description "Allow port 9000 access for play tagged instances" \
  --target-tags play
And allow port 443 for https. I haven't yet figured out how to restrict that to just the forwarding rule/https proxy.
gcloud compute firewall-rules create default-allow-http-443 \
  --allow tcp:443 \
  --source-ranges 0.0.0.0/0 \
  --description "Allow port 443 access"
Pheew—that's all. Now you can curl http://$ADDRESS and curl https://$ADDRESS, and you should get your status page.
Overall, I quite liked working with GCE. It took me a day to figure out all the fiddly-poo, but it's no more complex than AWS. And I appreciated that all the documentation has the command-line instructions that you can execute and stash away in your cheat sheet, not like those interminable “click here, then click here, then here” instructions that are common in the AWS world. Pricing is a bit better than AWS as well, so those credits will last you longer.
Finally, thanks to Ian Lewis for this article with this helpful image:
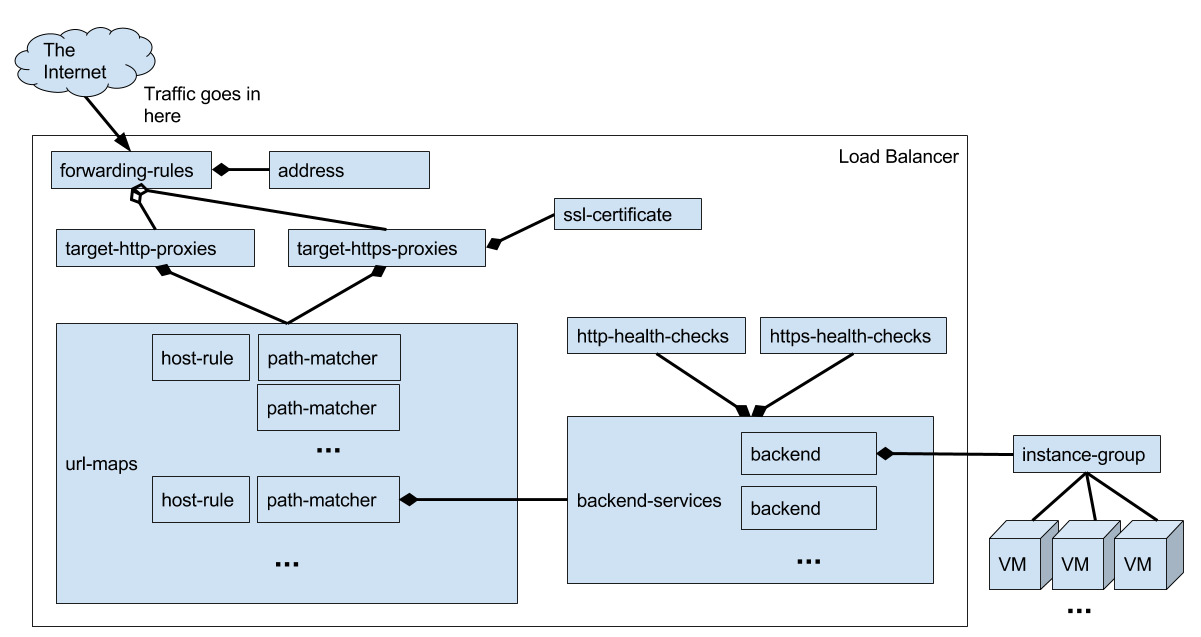
and to Guy Steele for his palindrome.

AWS has a nice service for managing SSL certificates, without having to go to an external vendor. But Google doesn't. For testing, you can get a free certificate that is valid for a month from RapidSSL. I've had to do this certificate stuff a few times, and each time I wonder why it's such a byzantine process. Maybe the mystique is required to justify the price of a certificate?
admin@mycompany.com and the ability to change the DNS for the host that you want, like myservice.mycompany.com. (In fact, all the certificate certifies is that you have access to mail at the domain being certified.) Make yourself a private key and a certificate signing request. When asked for the “common name”, be sure to put the name of the host, like myservice.mycompany.com. Don't leave any fields blank—just make something up for each of them.
openssl genrsa -out example.key 2048
openssl req -new -key example.key -out example.csr
example.csr into a form. After following the instructions in the mail they'll send to admin@mycompany.com, you'll get a certificate, something like
-----BEGIN CERTIFICATE-----
MIIFZjCCBE6gAwIBAgIQcipULRlwhpx48XWRgxthwzANBgkqhkiG9w0BAQsFADBC
...
EhshHpBCadoATFmf/+QMOxhm9MSHpDWz7DusK66hfLdyxKEEla+VFGRa
-----END CERTIFICATE-----
In the case of RapidSSL, they say you are also supposed to download an “intermediate” certificate. Just put both of them into a file
all.crt—literally paste one after another, first yours and then the intermediate:
-----BEGIN CERTIFICATE-----
...
-----END CERTIFICATE-----
-----BEGIN CERTIFICATE-----
...
-----END CERTIFICATE-----
myservice that points to the static IP address of your service.gcloud compute ssl-certificates create $SERVICE-cert --certificate all.crt --private-key example.key
curl https://myservice.myserver.com, and you should get your status page.
Comments powered by Talkyard.