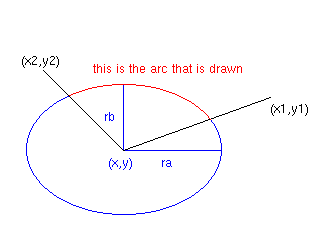
Figure 1. Drawing an arc
| Table of Contents | ChiLib Library Documentation |
The graphics context class is a simple interface to a graphics subsystem that is convenient and vendor-independent. It is, however, not particularly efficient, particularly because of its use of floating-point coordinates. The graphics context contains just enough functionality for the programs and exercises in the book. It simply is not meant to be an industrial- strength graphics interface.
At the time of this writing, there are two implementations of the graphics context class: one for the DOS Borland Graphics Interface (BGI) routines, which are specific to the Borland family of compilers, and one for Microsoft Windows. An Xlib implementation is planned.
      GraphicsContext();
      GraphicsContext(double xmin, double ymin, double xmax, double ymax);
The constructor opens and initializes the graphics system. Under BGI, it switches to graphics mode. Under Windows, it opens a window to display the graphics. If there is a problem that prevents the graphics display from opening, the program terminates with an error message. In particular, under BGI, the graphics context requires the that appropriate BGI driver (extension .BGI) and two character font files (SANS.CHR and TRIP.CHR) be present in the program's executing directory.
The default contructor initializes the user's upper left window coordinates to (0, 0) and and lower right to (20, 15). Of course, that does not mean that the window has 21 * 16 pixels; it just specifies the mapping from user coordinates to pixel coordinates. The (20,15) value was chosen because most displays have a 4 : 3 aspect ratio (for example VGA has 640 * 480 pixels) and because it is easy to remember. To choose a different coordinate system, use the second constructor or the set_window_coord operation, described subsequently.
The initial pen and fill colors are white. The initial brush pattern (the pattern used to fill areas) is SOLID_BRUSH. The font style is set to SYS_FONT.
You should create an instance of GraphicsContext at the beginning of your use of the graphics system. Under DOS, do not create more than one instance.
GraphicsContext gc; // opens the graphics system
void close(Bool wait = TRUE);
This function should be called when you are finished with your graphing work. If the wait flag is set to FALSE, the graphics window is closed immediately. Otherwise, you must press a key (under DOS) or close the window.
      GraphicsContext gc;
      // graphics routines here
      gc.close();
      void set_window_coord(double xmin, double ymin,
                            double xmax, double ymax);
This sets the coordinates for the viewport. The upper left coordinate becomes (xmin, ymin), and the lower right coordinate becomes (xmax, ymax). You can then plot, draw, or write anywhere within these new coordinates.
There are two reasons for changing the coordinate system. The first is that your problem may have a very natural coordinate system, and you should change to use it. Suppose you draw a bar graph with ten horizontal bars, each of which is between 0 and 100%. Then change (xmax, ymax) to (100, 10). The ith bar now has corners (i, 0) and (i+1, percentage[i]). If you find yourself scaling values, think of changing the coordinate system to let the graphics context do it for you instead.
The other reason for changing the coordinate is zooming. If you want to zoom in or out, just change the coordinate system and redisplay.
      gc.set_window_coord(0, 0, 100, 75); // panoramic view
      simulation.plot(gc);

      gc.set_window_coord(40, 60, 50, 65); // zoom in
      simulation.plot(gc);
The graphics context clips any portion that falls outside the display. Let the graphics context do the clipping. For simple applications, it can do so faster than you could.
Because of limitations with text directions, we enforce that xmin < xmax and ymin < ymax. If xmin > xmax, the values are swapped. If xmin = xmax, a precondition error is raised. The same holds for ymin and ymax.
      void point(double x, double y);
      void line(double xfrom, double yfrom, double xto, double yto);
      void rectangle(double x1, double y1, double x2, double y2);
      void ellipse(double x, double y, double ra, double rb);
      void arc(double x, double y, double ra, double rb,
               double x1, double y1, double x2, double y2);
      void piesegment(double x, double y, double ra, double rb,
                      double x1, double y1, double x2, double y2);
These functions draw various shapes. Lines and arcs are drawn with the current pen style and color, and closed shapes are filled with the current brush. Coordinates use the current window coordinate system.
The point operation draws a fat dot at (x,y).
The line operation draws a line from points (xfrom, yfrom) to (xto, yto).
The rectangle operation draws the rectangle with verticies at (x1, y1), (x1, y2), (x2, y1), (x2, y2).
The ellipse operation draws the ellipse with center at (x, y), and with ra and rb radii in the x- and y-directions, respectively. That is, the ellipse passes through the points (x ± ra, y ± rb).
The arc operation draws an arc of the ellipse with center (x, y) and radii ra and rb. The arc starts at the intersection of the line joining (x, y) with (x1, y1) and the ellipse, moves clockwise, and ends at the intersection of the line joining (x, y) with (x2, y2) and the ellipse.
Figure 1. Drawing an arc
The piesegment operation draws a sector of an ellipse by first drawing the arc as described for the arc operation, and then joining its end points with the center of the ellipse.
      GraphicsContext gc;

      gc.rectangle(5, 5, 10, 10);
         // draw a rectangle
      gc.point(7.5, 7.5);
         // ...with a point in the middle
      gc.line(5, 10, 10, 5);
         // ... and a diagonal through it
      gc.ellipse(2, 2, 2, 2);
         // draws a circle in the upper-left corner
      gc.ellipse(17, 11, 1, 3);
         // draws an elongated ellipse, lower-right
      gc.piesegment(15, 10, 5, 5, 10, 5, 15, 5);
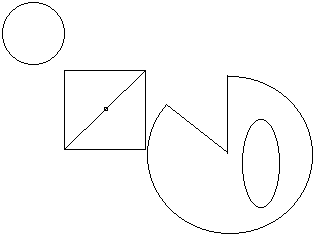
Figure 2. Output of the sample graphics code
      void text(String t, double x, double y)
      void text_extent(String t, double& x, double& y);
      void set_font_size(double s);
      void set_font_style(FontStyle);
The text operation writes the string t at (x, y) using the current pen color and font style and size.
To determine the size a given string will need on the graphics context, use text_extent. It returns the x- and y-size of the text.
      // draw red text inside a yellow box with center (c, c)
      GraphicsContext gc;
      String t = "Hello!";
      double x, y;
      double c = 6; // center the text at (6, 6)
      gc.rectangle(0, 0, 20, 15);
      gc.set_pen_color(GraphicsContext::YELLOW);
      gc.text_extent(t, x, y);
      gc.rectangle(c - (x/2) - 0.2, c - (y/2), c + (x/2), c + (y/2) + 0.2);
      gc.set_pen_color(GraphicsContext::RED);
      gc.text(t, c - (x/2), c - (y/2));
      gc.close();
The set_font_size and set_font_style operations determine the current font. Three fonts are available: SERIF_FONT, SANS_SERIF_FONT, SYS_FONT. (A serif is the small horizontal cross bar on the stems of letters. A sans serif character is one without serifs.) The first two are scalable. Font size 1 means that each character is one y-unit tall.
      void set_brush_style(BrushStyle);
      void set_brush_color(Color);
      void set_pen_style(PenStyle);
      void set_pen_color(Color);
The set_brush_style and set_brush_color operations set the style and color for those functions that fill shapes: ellipse, arc, piesegment. Use the BrushStyle and Color enumerations to specify preferences. The following brush styles are available: EMPTY_BRUSH, SOLID_BRUSH, HORIZ_BRUSH, FDIAG_BRUSH, BDIAG_BRUSH, XDIAG_BRUSH.
The set_pen_style and set_pen_color operations set the style and color for those functions that draw: point, line, rectangle, text. Use the PenStyle and Color enumerations to specify preferences. The following pen styles are avaliable: NORMAL_PEN, THICK_PEN, DOTTED_PEN, DASHED_PEN.
void set_rop_mode(RopMode);
The set_rop_mode operation sets the mode that the drawing operations use. COPY_ROP causes drawing operations to draw on top of the current display contents. XOR_ROP forms an exclusive OR between the pixels on the display and those of the pixels being rendered. In particular, drawing the same shape twice in XOR_ROP mode erases it completely. (In contrast, drawing it in the background color may affect other overlapping shapes.).
You can use the XOR_ROP mode to `move' an image without `trails':
      double i;
      GraphicsContext gc;
      // draw box without trails
      gc.set_rop_mode(GraphicsContext::XOR_ROP);
      for (i = 3; i <= 6; i += 0.1)
      {  gc.rectangle(i, i, i + 1, i + 1); // draw the box
         gc.rectangle(i, i, i + 1, i + 1);
            // draw it again to erase in XOR mode
      }
      // now draw, leaving trails
      gc.set_rop_mode(GraphicsContext::COPY_ROP);
      for (i = 9; i <= 12; i += 0.1)
      {  gc.rectangle(i, i, i + 1, i + 1);
         gc.rectangle(i, i, i + 1, i + 1);
      }
      gc.close();